

The Ultimate RV Roof Repair Manual: Stop Leaks Before They Start
Have you ever ever woken up on a soaked RV mattress in the middle of a rainstorm?
I have... And I assure you it's a special kind of betrayal when your RV roof gives out in the middle of a rainy night.
You see, back when I was a boy, I used to think that our family RV was built just as solid as the house we lived in. But man, was I ever wrong!
I remember it well. It was the summer of '92 and my old man had driven the family RV all the way to Grand Canyon National Park for some of the most breathtaking sightseeing we've ever experienced. The views truly were some of the most magnificent vistas I've ever seen to this day.
But one night, parked in the middle of nowhere, we could see trouble blowing in on the horizon. Storm clouds darker than any I'd seen before. Dad loaded us all into the RV and Mom tucked us into bed, and the last thing I remember was falling asleep to the sound of wind and rain pounding the sides of our little motorhome.
Then, I woke up... Soaked to the bone.
A leak started dripping in right above my bunk, and despite all the hard work and maintenance Dad put into taking care of the RV, there was no stopping that drip, drip, drip that night. By morning, my mattress had been soaked right through and there was a huge puddle on the floor of the RV.
That's when I first learned that RV roofs aren't as solid or as sturdy as the roof on our house.
Fortunately, I grew up and learned more about taking care of my own family RV. I've learned that RV roof problems are extremely common, especially if you don't take proper care of your road rig.
And that's exactly why we've put together the following comprehensive guide on RV roof repair.
RV Roof Repairs And Replacements - A Stark Warning!
Let’s get one thing out of the way... Replacing an RV roof isn’t cheap or easy.
Depending on the make and model of your rig, the severity of the water damage, and the shop you choose for your replacement, the final bill can range anywhere from a few grand to well over $10,000.
In other words, it can end up costing you a small fortune!
It’s a major job, and one that catches a lot of RV owners off guard.
And that's exactly why it's important to maintain and care for your RV before things get that bad. After all, a little bit of sealant here and there costs a lot less than a full roof replacement!
This guide is meant to be practical, helpful, and guaranteed to teach you how you can fix leaks when they do happen, or in some cases, stop them before they even start!

The Anatomy of an RV Roof (And Why It Leaks)
Ultimately, there are three different types of RV roofs: rubber membrane roofs, fiberglass roofs, and metal roofs. Let's take a closer look at each type of RV roof material.
- Rubber membrane roofs - Rubber roofs are typically made of either EPDM or TPO, which are both different types of synthetic rubber. When manufacturing an RV with a membrane roof, the rubber is laid down and stretched on top of the structural material, forming a tight, waterproof layer all in one shot.
- Fiberglass Roofs - Fiberglass RV roofs are lightweight and resistant to rot, rust, and even fire, making them an ideal choice for many RV builds. On the downside, fiberglass can crack easily, especially in sub-zero temperatures.
- Metal roofs - Some campers and RVs, particularly Airstream models, have metal or aluminum roofs. These types of RV roofs are extremely solid and durable. But just like rubber membrane roofs or fiberglass roofs, they're not impervious to leaks.
Knowing which type of roof you have ensures you'll be able to choose the right cleaners and repair products for your specific RV or camper model.
Ultimately, not every RV is built the same.
But it really doesn't matter which type of roof your RV or camper has, it can still develop leaks. Especially after years of being exposed to UV rays, rain, snow, tree branches and leaves, and everything else the outdoors might throw at it.
Generally, your roof's seams between panels, around vents, or near your A/C unit are where leaks occur most often. So be sure to frequently inspect these areas for dry, cracked, or peeling caulk, or other signs of water intrusion.
If you do notice your RV roof seals wearing out, you can use silicone sealants, elastomeric sealants, RV sealant tape, and other easy-to-use DIY camper roof sealant products to reinforce these locations and keep your camper leak-free season after season.

How to Spot Trouble: Diagnosing RV Roof Damage
Most of the time, RV owners only realize they've got a leak when they find a puddle on the ground of their rig after a rain storm (or like my childhood story, a soaked mattress). But usually, there were signs that a leak was forming far before that water started dripping in.
Here are just a few warning signs to look for:
- Cracked or peeling sealant between panel seams, vents, or your A/C unit.
- Visible soft spots, warped or lifted roof panels
- Bubbled or blistered interior ceiling panels
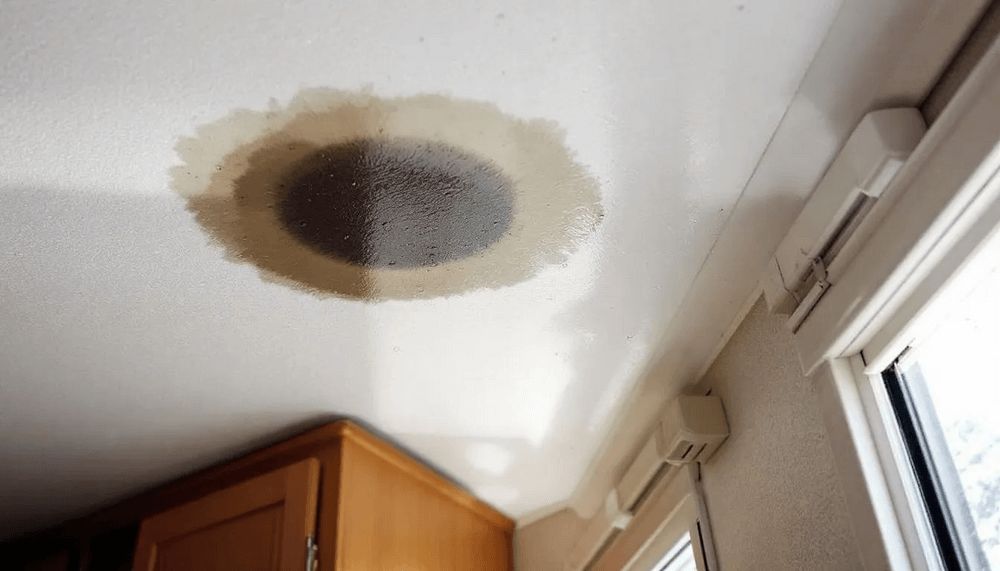
- Water stains on your roof, walls, or cabinetry
- Visible mold or a musty smell similar to a wet basement
- Rusted screws, bolts, nuts, or metal fixtures inside the RV
Obviously, these are just a few things you'll want to keep an eye out for. Generally, when you've got a leak, you're going to know it. But knowing what to look for can help you spot potential leaks before they happen!
You can also use a moisture meter to check if the interior of your RV is dry or not. These handy devices make it easy to assess the surfaces to know if any water or moisture is hiding behind them.
Similarly, a light test can help you find potential holes, gaps, or cracks. For this, you'll need two people, one outside and one inside the RV. The person inside shines a light on suspected leak areas, which are often near vents, corners, and A/C units. If the person outside spots any light shining through, then BINGO! You've found where your leak is coming from.
The next step is to seal that leak and avoid letting any more water get inside your recreational vehicle.
For more details on this, check out our in-depth guide on How To Find A Leak In Your RV Roof.

Can You Repair an RV Roof Yourself?
Whether you can repair an RV roof yourself really depends on the severity of your leak and the extent of the damage.
If your roof has been leaking for years and you've done nothing to stop it, there's a good chance the panels and structural materials of your RV will be rotten. Even if they're not completely rotten, there's a good chance you'll find more mold than you'd ever want to see in any one place.
So if this sounds like your story, you might want to call in a pro to help repair your RV roof.
On the other hand, newer or smaller leaks can often be repaired using nothing more than a few tools (scraper, utility knife, paint roller, etc), some RV sealant tape, or other types of RV roof sealants.
You can also purchase RV Roof Repair Kits to help you seal those pesky leaks and keep water out for good!
How to Fix Seams, Edges, Vents & Small Leaks
Thankfully, smaller leaks can often be patched by yourself, and won't require any sort of major roof replacements. Whether you've got a rubber, fiberglass, or aluminum roof on your rig, sealant tape, RV roof sealant, or camper roof repair kits can make short work of those pesky leaks.
No matter what type of repair product you choose, the first thing you'll need to do is clean your roof thoroughly. Remove any old, dry, or cracked sealant around your roof seams, edges, vents, or your A/C unit. We also recommend rubbing down the area with isopropyl alcohol and wiping it with a clean, dry cloth or paper towel.
The thing to remember here is that sealant tapes and roll-on products might not adhere properly if the area is dirty or wet. So a little bit of prep work goes a long way in making sure your repair job lasts longer than the season.
You should apply your sealant product around all areas where water might get in, including roof panel seams, corners and edges, vents, and A/C units. These are the most common areas where water makes its way in.
Be sure to check these spots often, clean them, and seal them up before leaks have a chance to develop.
Noticing bubbles or blisters on your RV roof membrane? This might look ugly, but most times, these aren't a cause of leaks and there's not really much you can do to fix them.
Bubbles are caused when the rubber membrane separates from the underlying substrate, which is often caused when your RV panels shift, expand, and contract due to changing temperatures.
Whatever you do, do not puncture or cut the blistered area to push it down. This is only going to make things worse and create a new entry point where water can get in.
For step-by-step instructions, be sure to check out our immersive guide on How To Repair RV Roof Seams or How To Fix An RV Roof Leak.

What About Soft Spots or Water Damage?
Soft spots, spongy floors, or noticeably weak areas, whether on your RV roof or on your walls, are never a good thing. Generally, this means that water has been getting in for some time now, and there's a good chance that the plywood holding your RV together has started to rot.
If you're noticing soft spots, the first thing to do is to find out where the water is coming from and seal it up as best you can.
Then, you'll want to assess the damage to see how much rotten structure there really is.
The bad news is that soft spots often mean the damage has already taken its toll. And you might need to call in a professional repair person to fix your RV.
But depending on how handy you are, you might be able to tackle this type of repair on your own.
Check out our in-depth guide on How To Repair Soft Spots In An RV Roof.
Roof Coating Vs. Roof Sealant: What’s the Difference?
At first glance, you might think these are both the same product type. But we assure you they're not!
RV roof coatings are used to form a protective, waterproof barrier over your entire roof. These products are generally used as preventative measures to protect your RV from leaks before they happen. RV roof coatings can also protect your RV from UV damage and improve your heating/cooling efficiency.
On the other hand, sealants are generally used to patch up holes, gaps, and cracks after your RV has sprung a leak. You don't apply sealant products to your entire roof, but only to specific areas where leaks have formed or where they're likely to form in the future.
You can learn more about these two great products in our RV Roof Coating Guide or our RV Roof Sealant Guide.
When Is It Time for an RV Roof Replacement?
Rubber membrane roofs generally last between 10 to 20 years, whereas fiberglass or metal roofs can last 20 years or more depending on how they're cared for.
So it's not uncommon for older RV models to eventually need a new roof. You'll know it's time for a full roof replacement if you're noticing a lot of new leaks, bubbles or blisters, visible cracks, tears, punctures, mold, or soft spots.
Now, we should warn you that RV roof replacement can be quite costly. It's impossible to give you an exact figure but be prepared to spend anywhere between a few thousand or $10,000 or more, depending on the make and model of your RV, the extent of the damage, and where you take it to get it repaired.
And that's precisely why taking care of your RV roof, sealing leaks, and protecting those weak points is so important.
Regardless, if you suspect widespread damage or damage to any of your RV's structural materials, it's best to consult with a pro before opening a can of worms that you're not going to be able to repair on your own.
Maintenance: The Best Way to Prevent All of This
Like many things in life, and in your garage, an ounce of prevention is worth more than a pound of cure.
As my old man once said, a can of roof sealant and an afternoon's worth of elbow grease is a hell of a lot cheaper than tearing apart a moldy RV ceiling. And he was right!
Regularly inspecting your RV roof, resealing your seams and vents every season, and keeping your RV roof clean and free from debris goes a long way.
Basic care and maintenance are just a lot cheaper and easier than always looking for and repairing leaks, replacing rotten roof supports, or paying other people to rebuild your RV from the ground up.
Ultimately, an RV roof coating can help extend the lifetime of your roof. Check out our guide on When and How Often Should You Reseal Your RV Roof.
What’s Next? Choose Your Repair Path
By now, you should know pretty much all there is to know about RV roof repair!
And if you've got yourself a leaky RV roof, it's time to roll up your sleeves, grab the repair product of your choice, and get to work!
Here are the three repair paths you'll likely want to take:
Here's a handful of other reference guides that we're sure you'll find handy for repairing RV roof leaks and keeping moisture where it belongs---outside of your RV.
- How To Find A Leak In Your RV Roof
- RV Roof Sealant Guide 2025
- How To Repair Soft Spots or Water Damage
- How To Repair Roof Seams & Vents
- Best RV Roof Repair Kits for 2025
- How To Apply RV Roof Coating The Right Way
- When And How Often To Reseal Your RV Roof

The Ultimate RV Roof Repair Guide - Frequently Asked Questions
We encourage you to browse our in-depth guides to learn about RV roof repair.
But just in case we've missed anything, here are the answers to a handful of questions we've often heard from our readers.
How much does it cost to repair an RV roof?
The cost of an RV roof repair varies drastically depending on the severity of the damage, and which route you take to fix it. Smaller leaks can often be replaced with an RV Roof Repair Kit, roof sealants, or caulks, which might cost anywhere between $50 to $150. But bigger leak repairs and partial or total roof replacement can cost anywhere between $1,000 to $10,000 or more. And that's precisely why it's better to maintain and take care of your RV roof before your problems get too expensive.
Can I walk on my RV roof during repairs?
Without knowing the extent of the damage, there's no way to tell you if it's OK to walk on your RV roof or not. In many cases, your roof will still be solid enough to walk on during repairs. However, if you've had a leaky roof for a long time and you've got soft spots or you suspect severe rot, you should probably avoid walking up there, just to be safe.
Can you use silicone on an RV roof?
Yes, many silicone sealant products are safe to use on your RV roof. However, these products need to be rated for outdoor use. So general-use or all-purpose silicone sealants should not be used on your roof. It's best to look for sealants that are designed specifically for RV use, which are often polyurethane sealants. They'll provide overall better UV protection, and heat absorption, and act as superior, longer-lasting solutions.
How long does RV roof sealant last?
RV roof sealants can last anywhere between 5 to 20 years. However, the lifespan of your repair depends on the type of product you use (silicone or elastomeric sealants, RV roof sealant tape, etc.), the quality of the repair job you do, and the type of exposure your RV gets. Use a cheap product, do a crap job applying it, and leave your RV exposed year-round, and your sealants won't last very long. But choose high-quality repair products, take your time and fix RV roof leaks properly, and care and maintain your RV, and your roof sealant can last decades.
What’s the best way to clean an RV roof before repair?
First, remove loose branches, leaves, and debris. Then wash your roof with an RV-specific cleaning solution and a soft mop or brush. Next, you'll want to use a utility knife or scraper to dislodge and remove any loose, dry, or cracked sealant from your roof seams. Remember that your RV roof surface must be completely clean and dry before applying RV sealant tapes or other products. Otherwise, they might not adhere properly and you're just going to end up with another leak.
Will insurance cover an RV roof leak?
That really depends on the specific insurance policy that you've purchased. In most cases, however, insurance won't cover an RV roof leak or water damage unless it was caused by an accident or an unforeseen accident, like a tree falling on your RV. That said, you might have better luck looking at your RV's manufacturer warranty, which might provide leak repair coverage for a limited time.