

How to Find a Leak in Your RV Roof | Signs, Tools & Inspection Tips
When we think of an RV roof leak, we usually picture a slow drip, drip, drip in the middle of a ceiling panel.
But most leaks aren't that easy to spot.
In fact, most roof leaks often go unnoticed until the damage becomes severe. Leaks can start anywhere, such as around the edges of your RV's roof, between roof seams, or around vents or other roof protrusions.
And once water starts getting in, it won't stop unless you take action about it...
That's why it's essential to regularly inspect and seal your RV roof to ensure that it A) hasn't been leaking and B) is not going to leak anytime soon.
In the following guide, we delve into how to identify the early warning signs of a leaky roof and take action before the issue worsens. For a more in-depth overview on how to fix leaks, check out our Ultimate RV Roof Repair Manual.
The First Signs of a Roof Leak in Your RV
Sagging ceiling panels, discoloration, soft spots, mold or mildew... These are just a few of the first signs you'll notice when you've got a leaky RV roof.
However, by the time you notice these signs, your roof may have already been leaking for some time.
The same principle applies to exterior signs.
If you notice your roof membrane bubbling up or warping, or if you've got dry, cracked, or peeling sealant near your roof edges or around vents, there's a good chance water is getting inside.
The good news is that you can learn how to repair soft spots or water damage in an RV roof. However, removing a roof membrane and replacing plywood can be a significant repair project, and you shouldn't take it lightly.

Common Leak Locations You Should Check First
It's not impossible to have a cracked roof panel that allows water to get in, especially if your RV has survived a major windstorm, hail, or physical damage from falling tree branches. However, most of the time, the middle of your panels won't be where a leak is coming from.
Instead, you're more likely to find the source of your leak in locations where hardware protrudes through your panels, which includes, but is not limited to:
- Panel seams or joints
- Roof edges
- Skylights
- Vents
- Ladder mounts
- AC units
It's less common to find leaks here, but improperly sealed windows or doors are also locations where water can get in.
All that said, you need to inspect these areas regularly to ensure they're properly sealed.
If you notice signs of water intrusion or if any of these locations have loose, cracked, or peeling sealant, you'll want to check out our guide on How to Repair Roof Seams, Edges, and Vents.
How to Inspect Your RV Roof for Leaks (Step-by-Step)
My old man once told me that inspecting an RV roof is a lot like checking your grandpa's bald spot for sunburn.
What he meant is that it's easy enough to get up there and take a peek. However, if you don't know what to look for (cracks, soft spots, busted seals), you'll miss the real damage.
And if you don't do it safely? Well, that's a whole different story.
On that note, let's take a step-by-step look at how to inspect your roof!

Step 1 - Safety first!
Slips and falls are some of the most easily avoidable injuries people sustain when working on their RVs. That's why it's essential to prioritize your safety at all times.
Before climbing on your RV's roof, ensure the surface is solid and safe to walk on.
Most RV roofs are designed to support the weight of a person, especially if your RV model has a built-in ladder. However, we still recommend checking your owner's manual to confirm that your roof is safe to walk on.
We also recommend ensuring you've all the right tools on hand and having a second person present with you, especially when climbing on the roof.
Step 2 - Clean your RV roof
Dirt, dust, and debris, such as leaves or branches, can accumulate on your roof during the off-season, making it challenging to identify potential leaks.
Therefore, it's essential to clean your roof and remove any debris before conducting your final inspection.
You don't necessarily have to scrub your roof clean, but brushing away dead leaves and dirt will make things a whole lot easier for you.
Step 3 - Exterior inspection
Next, you'll need to get up on your roof and look for signs of damage. Tears, punctures, or blistered areas are common signs that indicate a leaky roof. But you'll also want to check your seams and edges for signs of cracking, separation, or lifting.
You should also look for signs of leaking caulk, dried or cracked sealant, or damage near any roof accessories, such as skylights, vents, and AC units.
Step 4 - Inspecting the interior
You can also spot signs of a leak from inside your RV. Look for dark spots, discoloration, or warped materials, particularly near vents or skylights. Visible mold or mildew is another excellent indication that you've got yourself a leak.
As explained below, you can also use a moisture meter to check for signs of water damage on your walls, ceiling, and flooring panels.
Step 5 - Repair and maintenance
Finally, you'll need to repair any damaged areas and seal your roof to prevent leaks in the future.
Repairs can be made using RV sealant tapes, such as TitanPatch, or you can use lap sealants, RV-specific silicone caulks, and other products to keep water out. Learn how to pick the best option here: RV Roof Sealant Guide 2025.
We also recommend applying a quality RV roof sealant coating every few years for optimal protection season after season.

4 Leak Testing Tools and Techniques
Leaks are usually pretty easy to spot while it's raining. However, here are a few tips and tricks you can use to check for leaks, moisture behind panels, or water damage that may not be visible when the weather is nice.
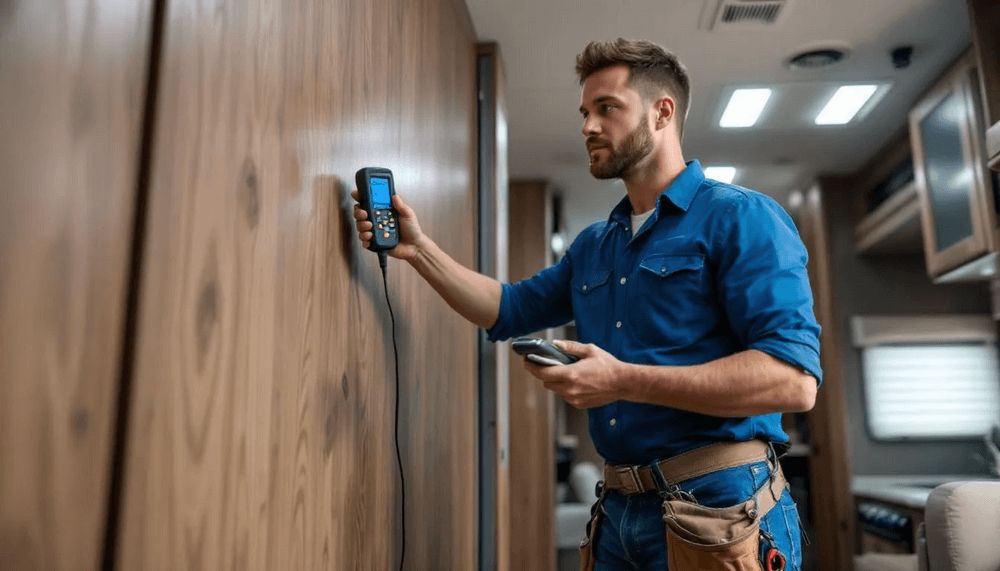
#1 - Detecting Leaks With A Moisture Meter
Moisture meters are the simplest and easiest way to determine if you've got water hiding inside the walls or interior surfaces of your RV.
Press the device's sensor against the surface and wait for the device to display a reading.
The only problem with a moisture meter is that it's not the best tool for determining where your leak is coming from. You may be able to locate the leak by identifying areas with progressively higher moisture readings.
But we recommend using the following techniques to pinpoint precisely where the water is coming from.
#2 - Air Pressure Test
Have you ever used soapy water to find a pin-sized hole in a tire? This is the same concept, and it's the best and safest way to find leaks.
Start by filling a spray bottle with a mixture of water and dish soap and spritz it around your roof vents, AC unit, skylights, and other areas. Then have another person inside the RV use an air compressor to spray air on these locations while keeping an eye on the exterior. The trick, however, is that you need to place the air hose close or directly against the surface to push the air through.
No bubbles? No leak!
But if you see bubbles, you've found the source of your leak, my friend!
#3 - Performing A Flashlight Test
You can also use a flashlight to try to pinpoint the location of a leak. Similar to the air pressure test, you'll need a second person to perform this test.
Have one person shine the light around your roof protrusions and see if you can notice light escaping. Similar to the air pressure test, the key here is to get your flashlight as close to the surface as possible to try and "force" the light through any potential gaps.
The flashlight test also works a lot better when it's dark both inside and outside the RV, which makes it easier to spot any light coming through.
If you see light coming through, you'll need to get yourself an RV roof repair kit to patch the gap.
#4 - Using A Garden Hose
Another practical technique is to simulate rain by spraying a garden hose on the roof of your RV.
Simply hose down your roof, focusing on areas where you suspect your leak might be coming from (vents, seams, edges, etc.).
If you notice water drops on the inside when doing this. Voila! You've found your leak!
The only problem with this technique is that water can travel away from its entry point on your roof. So you might be adding moisture to your RV and still not be able to locate the exact source of your leak.

Can I Find the Leak from Inside the RV?
You may or may not be able to locate a leak from the inside of your RV, depending on where the source is and the severity of the damage.
That said, you'll be able to tell you've got a leak if you notice any of the following signs:
- Sagging ceiling panels
- Water stains on your ceiling, walls, or cabinetry
- Warped cabinets or wall panels
- Water pooling on your RV floor
Of course, these are just a handful of signs of water damage. You can also tell you've got a leak if you notice a damp or musty odor inside your RV.
That smell typically occurs when a leak has been present for an extended period of time. But it's a dead giveaway that you've got rot, mold, and water damage.
What to Do After You've Found the Leak
Once you've found the source of your leak, you'll need to learn how to fix an RV Roof Leak.
The good news is that repairing small leaks is typically a straightforward process. The bad news is that you'll need to decide whether to tackle it yourself or you should get a quote from a professional.
If you suspect that water has been entering your RV for a long time, or if there's considerable damage or rotted structural materials, you may want to contact a professional RV dealer or repair shop for assistance. In this case, you might also want to contact your insurance company to see if you've got any coverage.
However, for minor leaks and repairs, here's a quick breakdown on how to fix them.
- Decide if you're going to use RV sealant or an RV roof sealant
- Remove any dust, dirt, or debris from your RV roof
- Clean the repair area with an RV-safe cleaner
- Dry the area thoroughly before attempting your repair
- Apply your sealant product carefully
- Let cure - Usually 24-48 hours.
- Test using the techniques described above, such as the flashlight, air pressure, or hose methods.

Frequently Asked Questions - How To Find RV Roof Leaks
If you're dealing with a leaky RV roof, we recommend checking out our Ultimate RV Roof Repair Manual for more in-depth information on how to address your issue.
In the meantime, here are a handful of frequently asked questions we hear from our readers.
What causes most RV roof leaks?
There's a massive variety of factors that can cause RV leaks. However, the most common culprit is aging, dried, or cracked caulk. Caulk is typically used to seal areas where appliances or vents protrude through your roof. Most RV caulks and sealants are designed to withstand UV exposure and extreme weather conditions, but they can still dry out, crack, peel, and allow water to seep in. That's why it's crucial to inspect your roof regularly to ensure any existing sealant is still in good condition.
Can I use a garden hose to find an RV roof leak?
Yes, you can use a garden hose to simulate rain and find out where the water is making its way in. We recommend having two people present for this, one person inside and the other outside. The problem with this method is that leaks aren't always visible, and they may be hiding behind cabinets, appliances, or paneling. So you could end up putting water behind your panels, and still have trouble finding where your leak is coming from. That's why we recommend using a moisture meter to determine where water might be hiding behind interior surfaces.
Do I need to remove the sealant to find the leak?
You don't necessarily need to remove old sealant when looking for a leak. Removing old sealant might cause new gaps where leaks can start. However, it's recommended to remove existing loose sealant before applying new sealant tape or lap sealants, especially if it's cracked, peeling, or dried out. Removing old sealants allows for better adhesion and a more secure seal.
Should I walk on my RV roof to inspect it?
It depends on the type of RV you have. Some RVs are designed to be walked on and have a ladder built in. Whereas other RVs do not have a structurally sound roof meant to support the weight of a person. If your RV model has a ladder, it's likely safe to walk on, unless the roof has sustained significant damage from water intrusion over the years. Similarly, fiberglass and metal roofs are generally solid enough to walk on. If you're unsure about walking on your RV roof, it's best to consult your owner's manual.
What's the best tool to detect RV roof leaks?
A moisture meter is by far the best tool for detecting roof leaks. These devices can easily scan your walls, ceiling panels, or floors and instantly tell you if moisture is present beneath the surface. That said, while these tools are great at identifying moisture, they don't help you determine the source of the water.